
I’ve been using Gitea and Woodpecker CI for a while now, and they’ve become invaluable tools when working on larger projects or collaborating with multiple people. The ability to catch integration issues earlier, enforce clean workflows, and keeping pushes honest helps maintain a high standard of code quality. With some major updates released recently, I decided it was time for a fresh install of latest versions.
Setup Docker Volumes
For the Gitea /data directory, I prefer host (bind) volumes simply to make backups easier. The downside is now you have to handle file permissions. If security isn’t a concern, having it in your home directory isn’t a bad choice.
sudo mkdir -p /<path_do_data_dir>/docker/volumes/gitea
sudo chown -R 1000:1000 /<path_do_data_dir>/docker/volumes/gitea
Docker Compose
Use docker compose (or create a stack in portainer). Note, at this point, we are only interested in the Gitea container.
Here is the docker_compose.yml I used for my setup.
version: "3.8"

networks:
  gitea:
    external: false

services:
  gitea:
    image: docker.gitea.com/gitea:latest
    container_name: gitea
    environment:
      - USER_UID=1000
      - USER_GID=1000
    restart: always
    networks:
      - gitea
    volumes:
      - /<path_do_data_dir>/docker/volumes/gitea:/data
      - /etc/timezone:/etc/timezone:ro
      - /etc/localtime:/etc/localtime:ro
    ports:
      - "3333:3000"
      - "2222:22"

  woodpecker-server:
    image: woodpeckerci/woodpecker-server:v3
    container_name: woodpecker-server
    restart: always
    ports:
      - "8888:8000"

    networks:
      - gitea
    volumes:
      - woodpecker-server-data:/var/lib/woodpecker/
    environment:
      - WOODPECKER_OPEN=true
      - WOODPECKER_HOST=http://<ip_address>:8888
      - WOODPECKER_GITEA=true
      - WOODPECKER_GITEA_URL=http://<ip_address>:3333
      - WOODPECKER_GITEA_CLIENT=<secret_client_id_from_gitea>
      - WOODPECKER_GITEA_SECRET=<secret_code_from_gitea>
      - WOODPECKER_AGENT_SECRET=<shared_secret_code>
      - WOODPECKER_DATABASE_DRIVER=sqlite3
      - WOODPECKER_DATABASE_DATASOURCE=/var/lib/woodpecker/woodpecker.sqlite
      - WOODPECKER_LOG_LEVEL=debug
    depends_on:
      - gitea

  woodpecker-agent:
    image: woodpeckerci/woodpecker-agent:v3
    container_name: woodpecker-agent
    restart: always
    depends_on:
      - woodpecker-server
    networks:
      - gitea
    volumes:
      - /var/run/docker.sock:/var/run/docker.sock
      - woodpecker-agent-config:/etc/woodpecker
    environment:
      - WOODPECKER_SERVER=woodpecker-server:9000
      - WOODPECKER_AGENT_SECRET=<shared_secret_code>
      - WOODPECKER_LOG_LEVEL=debug
      - WOODPECKER_BACKEND_DOCKER_NETWORK=gitea-woodpecker_gitea
      - WOODPECKER_MAX_WORKFLOWS=1

volumes:
  woodpecker-server-data:
  woodpecker-agent-config:
Note: Once final operation is confirmed, you can remove WOODPECKER_LOG_LEVEL.
Some Gitea homework first
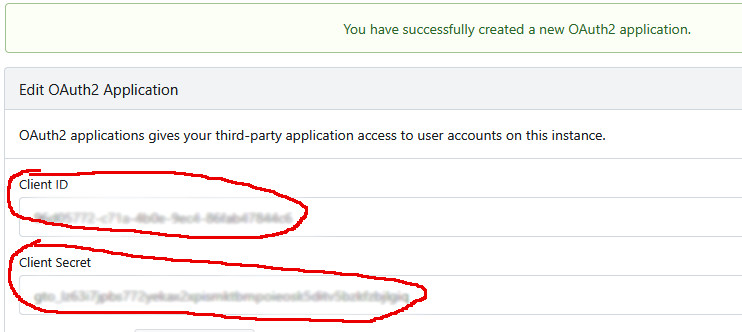
To allow Woodpecker to access Gitea repositories, we need to setup an OAuth key. Log into your fresh new Gitea instantiation and go to your profile (your avatar symbol in the upper right corner) and go to Setting/Applications At the bottom, Create a new OAuth2 Application.
Name:  Woodpecker CI
Redirect URI:  http://<ip_address>:8888/authorize
You should have successfully created a new OAuth ID and Key. Update your docker_compose file with the Client ID and Client Secret.
Next, we need to enable Webhooks in Gitea. Webhooks allow Gitea to inform Woodpecker that an event occurred (push, merge request, etc).
In /<path_to_data_dir>/docker/volumes/gitea/gitea/conf, there is a file app.ini. Edit this file and place this snippet at the end of the file.
[webhook]
ALLOWED_HOST_LIST = external,loopback
Finally, the Woodpecker CI
First, we need to update our docker compose file with all the new info.
WOODPECKER_GITEA_CLIENT= Gitea OAuth client ID
WOODPECKER_GITEA_SECRET= Gitea OAuth secret
WOODPECKER_AGENT_SECRET= a random text string shared between server and agent
Stop then restart the containers using the updated docker_compose file.
Once up, you can now log into Woodpecker for the first time. The first time running, you will have to authorize the connection and log into your Gitea account through the Woodpecker interface.
First Woodpecker pipeline
Create a new repo in Gitea and clone it locally. Add file ‘.woodpecker/firstpipeline.yml’ to the root of your repo:
when:
  - event: push
    branch: main
steps:
  - name: build
    image: alpine
    commands:
      - echo "This is the build step"
      - echo "Hello from Woodpecker CI"
Commit and push.
You should now see Woodpecker running your pipeline and output the echo data.
Final Notes and Thoughts
I use Portainer for docker administration. A warning that Portainer creates networks as <stack_name>_<network_name>, which is why the network is called “gitea” but DOCKER_NETWORK is “gitea-woodpecker_getea”
Woodpecker does NOT use a “latest” keyword. Use v3 to select the latest v3.x.x
If you use the “Run Pipeline” button inside Woodpecker, make sure the pipeline has something for event “Manual” to do. Otherwise, nothing seems to happen and things might look broken.
Gitea and Woodpecker CI are a powerful combination of tools that can be more than just used for integration testing.
At the time of writing, Gitea was at V1.24.2 and Woodpecker was v3.7.0